


 Open Xara Photo & Graphic Designer and the first thing we need to do is add the card template and clipart into the Designs Gallery. On the right you
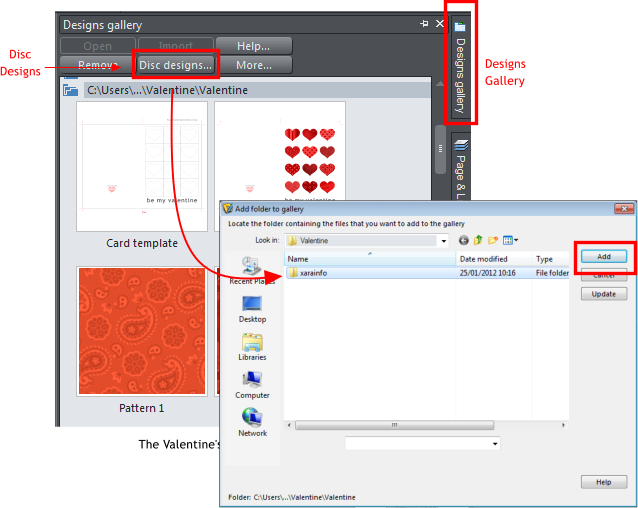
will see the vertical tab - Designs Gallery. Select it and it will fly out to reveal several folders of designs. In the Designs Gallery select Disc designs then
browse to the folder on your computer that contains the unzipped files (you will see only a Xarainfo file), select it and then select to add it to the
index. Click on the folder and you will see that it contains a collection of 20 tiling patterns and 20 textures.
To get started
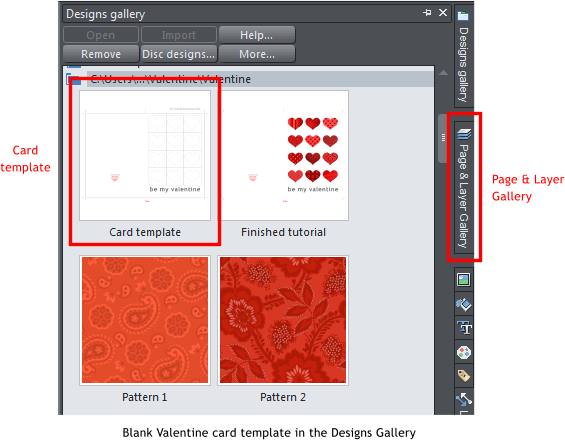
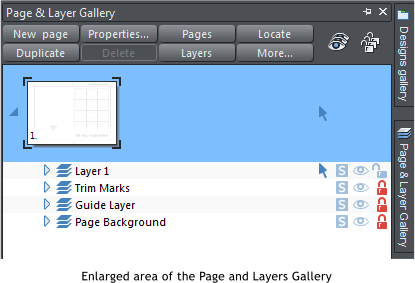
From the Designs Gallery double click the blank Valentine card template to open it. Once you have the file open, in the Page & Layer Gallery (the
vertical tab under the Designs Gallery), click on the small arrow to the left of the page to reveal the layers.
The template is made up from 4 layers:
1. Layer 1 will contain all design elements, including default valentine text.
2. Trim Marks layer contains marks for trimming and folding the finished card.
3. Guide layer contains a border rectangle to show final trim size and a positional guide for the textures and hearts. Click on the eye icon next to
the guide layer to toggle the visibility. Remember to turn off this layer before printing.
4. Page Background layer contains the background shape.
Assembly of the patterns and textures
We now need to fill all of the 12 squares on the card front. From the Designs Gallery in the Valentine clipart folder you will find a collection of 20
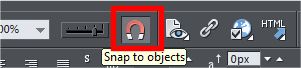
patterns and 20 textures, we’ll add a bit of interest by mixing the patterns and textures in the design. The ‘Snap to Objects’ function is very useful for
aligning repeating designs, so ensure that it is switched on by going to the magnet on the top tool bar and selecting it (when turned on it will go a
lighter grey). Aligning the textures will now be a doddle.
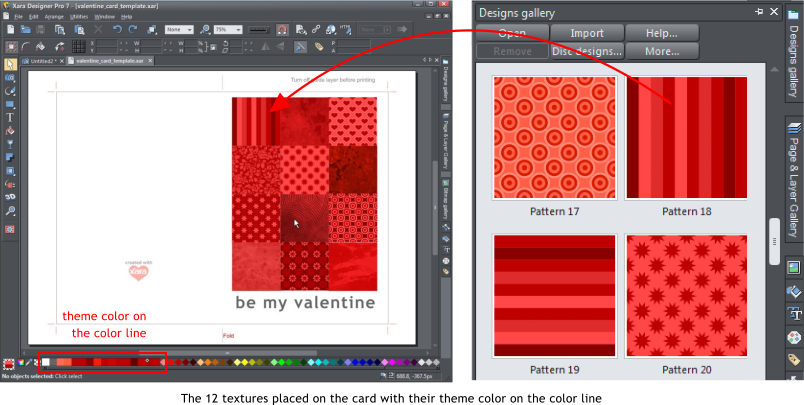
My choice for the first texture is Pattern18. Drag the Pattern18 square from the Designs Gallery onto the page and position it into the top left square.
Notice how the Snap to Objects acts like a little magnet to align your first texture with the guide layer. The blue lines tell you when all is correctly
aligned.
Choose the rest of your patterns and textures, here’s my choice:
Pattern 18
Texture 1
Pattern 7
Pattern 3
Pattern 20
Texture 4
Pattern 15
Texture 7
Pattern 16
Texture 9
Pattern 13
Texture 6
Each time you drag in a new texture, you will see the corresponding named color theme added to the color line at the bottom.
Open Xara Photo & Graphic Designer and the first thing we need to do is add the card template and clipart into the Designs Gallery. On the right you
will see the vertical tab - Designs Gallery. Select it and it will fly out to reveal several folders of designs. In the Designs Gallery select Disc designs then
browse to the folder on your computer that contains the unzipped files (you will see only a Xarainfo file), select it and then select to add it to the
index. Click on the folder and you will see that it contains a collection of 20 tiling patterns and 20 textures.
To get started
From the Designs Gallery double click the blank Valentine card template to open it. Once you have the file open, in the Page & Layer Gallery (the
vertical tab under the Designs Gallery), click on the small arrow to the left of the page to reveal the layers.
The template is made up from 4 layers:
1. Layer 1 will contain all design elements, including default valentine text.
2. Trim Marks layer contains marks for trimming and folding the finished card.
3. Guide layer contains a border rectangle to show final trim size and a positional guide for the textures and hearts. Click on the eye icon next to
the guide layer to toggle the visibility. Remember to turn off this layer before printing.
4. Page Background layer contains the background shape.
Assembly of the patterns and textures
We now need to fill all of the 12 squares on the card front. From the Designs Gallery in the Valentine clipart folder you will find a collection of 20
patterns and 20 textures, we’ll add a bit of interest by mixing the patterns and textures in the design. The ‘Snap to Objects’ function is very useful for
aligning repeating designs, so ensure that it is switched on by going to the magnet on the top tool bar and selecting it (when turned on it will go a
lighter grey). Aligning the textures will now be a doddle.
My choice for the first texture is Pattern18. Drag the Pattern18 square from the Designs Gallery onto the page and position it into the top left square.
Notice how the Snap to Objects acts like a little magnet to align your first texture with the guide layer. The blue lines tell you when all is correctly
aligned.
Choose the rest of your patterns and textures, here’s my choice:
Pattern 18
Texture 1
Pattern 7
Pattern 3
Pattern 20
Texture 4
Pattern 15
Texture 7
Pattern 16
Texture 9
Pattern 13
Texture 6
Each time you drag in a new texture, you will see the corresponding named color theme added to the color line at the bottom.


 © Xara Group Limited

 eye icon

 Arrow that
reveals layers
Arrow that
reveals layers