
Websites are becoming more dynamic with more movement and animation, instead of simple, 'old style' static, low impact websites.
The evolution started with the simplest mouseover effect, whereby objects like navigation bars and buttons highlighted as you moved over them, and it has evolved from there.
Now most modern websites have animation in one form or another - objects sliding in, fading in or out, more complex animations on mouseover (e.g. a message appears on a
photo as you mouse over it) and the latest effects tied to scrolling - from a simple 'stick at top' NavBar (so it's always available and doesn't scroll off the top as it would on a
static website), to animations tied to scrolling, which include parallax effects.
This month we're just focusing on parallax, and demonstrating how this simple one page website was created. It's amazing to think that such effects can be done with no
programming, Javascript , coding, CSS or anything technical!
To try it, download the trial version of Web Designer 365 Premium.
Web page using parallax scrolling, sticky heading and sub heading with reveal animation
See Crazy Cakes web page
What is Parallax Scrolling?
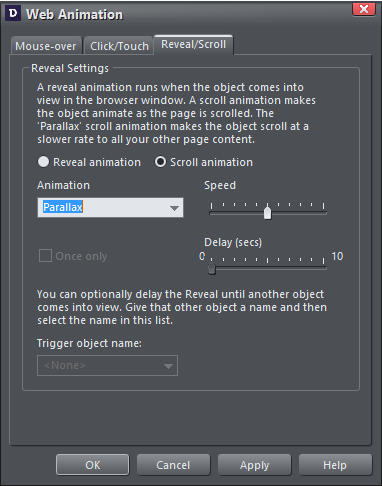
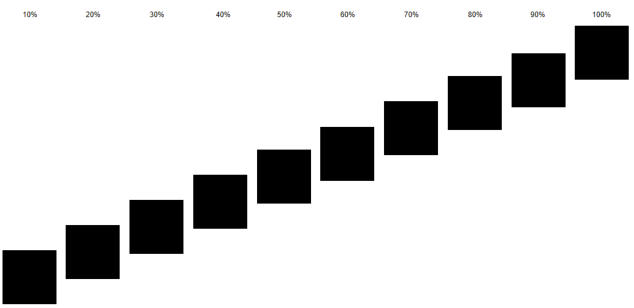
Parallax is the effect you get when, for example, looking out of a train window and things near you wizz past quickly, while things further away scroll past your view more slowly, and things in the distance hardly move at all. You can create a website using this effect to give a sort of 3D appearance as you scroll down the web page. Parallax is now being used more generally to give interesting scroll effects - and it’s a great way to create an innovative website which will be noteworthy and admired by visitors. Click on the Crazy Cakes web page to see an example of some interesting scroll effects. In Web Designer 365 Premium you can control how fast things scroll. There's a slider control in the new Parallax animation dialog (details below). Using the slider you can control how fast things scroll from 0% of the normal speed (which means objects do not scroll at all - they are the same as 'sticky') up to 100% of the scroll speed, which is the same as all normal page items ie. the objects scroll as fast as you scroll the page. Look at this simple rectangle test which demonstrates the different speeds. You can download the file to experiment with your Web Designer 365 Premium - download There are 10 simple squares across the page, to which I've set variable parallax speeds, between 10% and 100% of normal speed. (We recommend using the scroll bar not the mouse wheel to best see the effect). You can see that the speed of each rectangle scrolls differently.How to Create your Parallax Effects
Firstly, select the object that you wish to add the parallax effect to. Then select the Menu option Utilities and then Web Animation and the Reveal/Scroll tab. Then select the scroll animation option, and Parallax from the Animation drop-down menu and click ‘Apply’. In this instance, parallax set at 50%.Viewing Scrolling Objects:
When viewing on a published web page, objects have to start 'below the fold' i.e. off the bottom of the page for scroll effects to work. If they start on a visible part of the page then there is no scrolling to see them, so if you applied a scroll effect nothing would happen. This often means you need to make your web page taller - which in Web Designer is as easy as selecting the bottom edge line and dragging it down the window to make your web page as tall as you wish.Stacking Order
If you want objects to scroll on top of other objects, you need to take care to get the stacking order right - use the Arrange > ’move backwards’ or ‘bring to front’ re-ordering controls.Experiment
It may be a little difficult to get your head around what's actually happening on the page - so experiment - it's the best way to explore the possibilities. To see your web page at any time during its creation select ‘Preview page’.Features of the Crazy Cakes Web Page
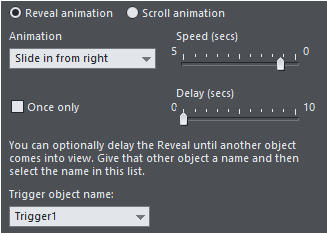
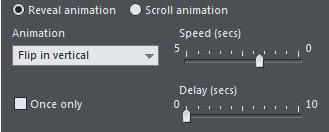
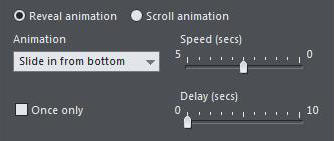
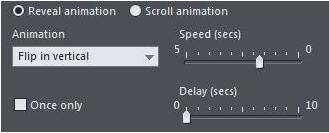
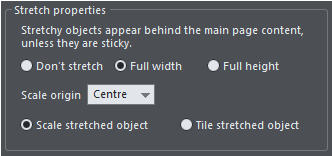
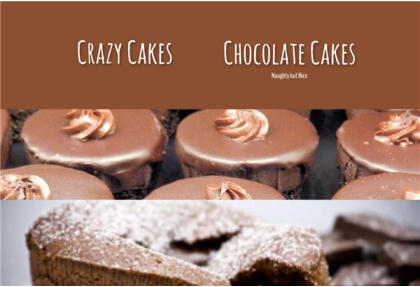
Here’s how this Crazy Cakes Web page was created: 1. Open a New blank web page document, 960px wide, and add a selection of photos. 2. All photos are stretched to be full width. Using the new Photo stretch / clip feature it is now easy to make images wide, like a panorama. Just click to select the photo and drag the new style control handles to make it wider. 3. All photos are set to 'stretch full width'. You'll see that as you vary your browser window width, the images scale to fit. This is the Utilities > Web Sticky /Stretchy dialog: 4. The top picture has a parallax value of 50% normal scroll speed. 5. The Crazy Cakes heading (using AmaticSC Google font) has a soft shadow and is set to be sticky (same Web Sticky / Stretchy dialog as above). This means it never moves as you scroll the page. 6. The Crazy Cakes heading also has a reveal effect 'slide in from bottom' which it does as the heading is revealed. 7. The cyan rectangle under the photo is also set to parallax scroll 50% so that the top two pictures will move together. 8. The right top column of text is Google Font 'BenchNine Regular', set to white. This has a Reveal Animation (Utilities > Web Animation) of 'Flip in vertical'. Which means that as soon as it's revealed it performs this animation - and every time you scroll back on it, it animates again. There are many different reveal animations that you can apply to your objects. This column of text has no parallax scroll. This is because it has a reveal animation and it can't have scroll animation at the same time. So as you scroll the page up - this text goes over the top two images - they are set at half scroll speed. 9. There is a collection of chocolate related photos below this. They have all been set with different Parallax scroll speeds. Trial and error is required here to get the desired overlapping / underlapping and scroll speeds. 10. The brown rectangle is a simple brown rectangle with no effects and no Parallax scroll - it scrolls up the page at the speed of the browser. 11. The 'slide in 'Chocolate Cakes' text and its associated 'Naughty but nice' text use a more advanced 'trigger' effect, so they are only triggered when an invisible trigger object (in this case, a bit of text off the side of the page) gets scrolled on - this triggers the slide-in animation. So that's how the 'Chocolate Cakes' heading only slide-ins when you've scrolled down a certain distance. To create this: Place the trigger object down the page so as it's scrolled on, it will trigger the animations. Using the ‘Name’ Dialog, give it a name say 'Trigger1'. Then on the Chocolate Cake heading, which starts off on the right side, apply this: 12. The Slide in from right reveal animation is set to about 1 second, with the Trigger object name set to be Trigger1. This type of 'trigger' concept is very powerful and allows quite complex animations to be created and controlled to appear when you want them to. I was experimenting with parallax to create a concertina effect with the chocolate photos. You can see the results on these two web pages - ParallaxTest1 and ParallaxTest2.Scrolling the Web Page
On most browsers it is recommended that you use the scroll bar not the mouse wheel to best view the parallax scroll. The FireFox browser has by far the smoothest scrolling, and still works very well even using mouse-scroll. The parallex effect also works on touch devices where you swipe scroll instead. But it should be noted that if you use these effects a lot, with large items or hi-res images scrolling, this does require quite a fast phone / tablet to keep up. Modern phones and tablets are nearly as fast as desktop PCs now.Replace Symbol (another new feature)
Assuming you've opened the RectangleDemo file. That arrow was created using the Symbol Picker (Insert > Symbol...). There are now more than 1500 great quality symbols like this included in Web Designer 365. To replace it simply right click on the symbol and select 'Replace Symbol'. This accesses the symbol picker where you can search for a symbol of your choice (for example, search for 'arrow' to see all the available arrow symbols). Simply select any alternative symbol as a replacement. It’s that easy!Xara Web Designer 365
Xara Web Designer is unlike any web design software you will have seen before; it’s an easy template based solution that gives you total page design freedom, no HTML skills required. It comes in 2 versions, Web Designer and Web Designer Premium that offers advanced web design features (including parallax). More information. Give it a try! Download Web Designer trial version.
Copyright © 2016 Xara Group Limited.
Page created with Xara Designer Pro


Websites are becoming more dynamic with more movement and animation, instead of simple, 'old style' static, low impact websites.
The evolution started with the simplest mouseover effect, whereby objects like navigation bars and buttons highlighted as you moved over
them, and it has evolved from there. Now most modern websites have animation in one form or another - objects sliding in, fading in or out,
more complex animations on mouseover (e.g. a message appears on a photo as you mouse over it) and the latest effects tied to scrolling -
from a simple 'stick at top' NavBar (so it's always available and doesn't scroll off the top as it would on a static website), to animations tied to
scrolling, which include parallax effects.
This month we're just focusing on parallax, and demonstrating how this simple one page website was created. It's amazing to think that such
effects can be done with no programming, Javascript , coding, CSS or anything technical!
To try it, download the trial version of Web Designer 365 Premium.
Web page using parallax scrolling, sticky heading and sub heading with reveal animation
See Crazy Cakes web page
What is Parallax Scrolling?
Parallax is the effect you get when, for example, looking out of a train window and things near you wizz past quickly, while things further away scroll past your view more slowly, and things in the distance hardly move at all. You can create a website using this effect to give a sort of 3D appearance as you scroll down the web page. Parallax is now being used more generally to give interesting scroll effects - and it’s a great way to create an innovative website which will be noteworthy and admired by visitors. Click on the Crazy Cakes web page to see an example of some interesting scroll effects. In Web Designer 365 Premium you can control how fast things scroll. There's a slider control in the new Parallax animation dialog (details below). Using the slider you can control how fast things scroll from 0% of the normal speed (which means objects do not scroll at all - they are the same as 'sticky') up to 100% of the scroll speed, which is the same as all normal page items ie. the objects scroll as fast as you scroll the page. Look at this simple rectangle test which demonstrates the different speeds. You can download the file to experiment with your Web Designer 365 Premium - download There are 10 simple squares across the page, to which I've set variable parallax speeds, between 10% and 100% of normal speed. (We recommend using the scroll bar not the mouse wheel to best see the effect). You can see that the speed of each rectangle scrolls differently.How to Create your Parallax Effects
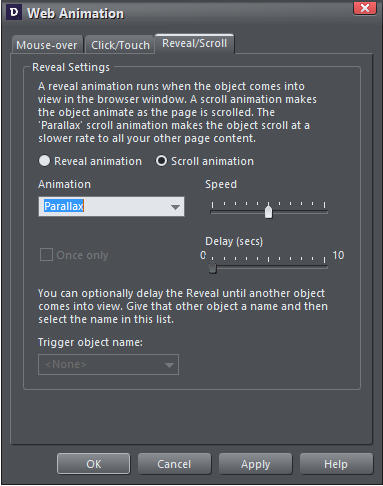
Firstly, select the object that you wish to add the parallax effect to. Then select the Menu option Utilities and then Web Animation and the Reveal/Scroll tab. Then select the scroll animation option, and Parallax from the Animation drop-down menu and click ‘Apply’. In this instance, parallax set at 50%.Viewing Scrolling Objects:
When viewing on a published web page, objects have to start 'below the fold' i.e. off the bottom of the page for scroll effects to work. If they start on a visible part of the page then there is no scrolling to see them, so if you applied a scroll effect nothing would happen. This often means you need to make your web page taller - which in Web Designer is as easy as selecting the bottom edge line and dragging it down the window to make your web page as tall as you wish.Stacking Order
If you want objects to scroll on top of other objects, you need to take care to get the stacking order right - use the Arrange > ’move backwards’ or ‘bring to front’ re-ordering controls.Experiment
It may be a little difficult to get your head around what's actually happening on the page - so experiment - it's the best way to explore the possibilities. To see your web page at any time during its creation select ‘Preview page’.Features of the Crazy Cakes Web Page
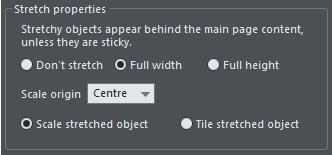
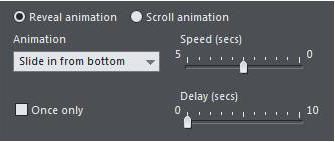
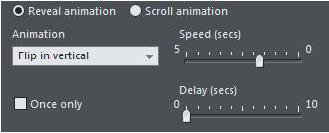
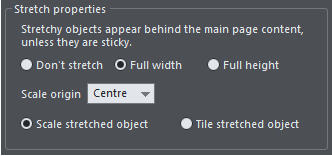
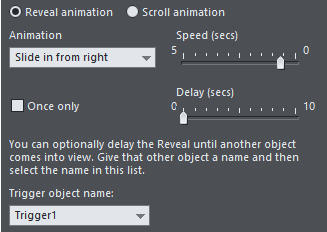
Here’s how this Crazy Cakes Web page was created: 1. Open a New blank web page document, 960px wide, and add a selection of photos. 2. All photos are stretched to be full width. Using the new Photo stretch / clip feature it is now easy to make images wide, like a panorama. Just click to select the photo and drag the new style control handles to make it wider. 3. All photos are set to 'stretch full width'. You'll see that as you vary your browser window width, the images scale to fit. This is the Utilities > Web Sticky /Stretchy dialog: 4. The top picture has a parallax value of 50% normal scroll speed. 5. The Crazy Cakes heading (using AmaticSC Google font) has a soft shadow and is set to be sticky (same Web Sticky / Stretchy dialog as above). This means it never moves as you scroll the page. 6. The Crazy Cakes heading also has a reveal effect 'slide in from bottom' which it does as the heading is revealed. 7. The cyan rectangle under the photo is also set to parallax scroll 50% so that the top two pictures will move together. 8. The right top column of text is Google Font 'BenchNine Regular', set to white. This has a Reveal Animation (Utilities > Web Animation) of 'Flip in vertical'. Which means that as soon as it's revealed it performs this animation - and every time you scroll back on it, it animates again. There are many different reveal animations that you can apply to your objects. This column of text has no parallax scroll. This is because it has a reveal animation and it can't have scroll animation at the same time. So as you scroll the page up - this text goes over the top two images - they are set at half scroll speed. 9. There is a collection of chocolate related photos below this. They have all been set with different Parallax scroll speeds. Trial and error is required here to get the desired overlapping / underlapping and scroll speeds. 10. The brown rectangle is a simple brown rectangle with no effects and no Parallax scroll - it scrolls up the page at the speed of the browser. 11. The 'slide in 'Chocolate Cakes' text and its associated 'Naughty but nice' text use a more advanced 'trigger' effect, so they are only triggered when an invisible trigger object (in this case, a bit of text off the side of the page) gets scrolled on - this triggers the slide-in animation. So that's how the 'Chocolate Cakes' heading only slide-ins when you've scrolled down a certain distance. To create this: Place the trigger object down the page so as it's scrolled on, it will trigger the animations. Using the ‘Name’ Dialog, give it a name say 'Trigger1'. Then on the Chocolate Cake heading, which starts off on the right side, apply this: 12. The Slide in from right reveal animation is set to about 1 second, with the Trigger object name set to be Trigger1. This type of 'trigger' concept is very powerful and allows quite complex animations to be created and controlled to appear when you want them to. I was experimenting with parallax to create a concertina effect with the chocolate photos. You can see the results on these two web pages - ParallaxTest1 and ParallaxTest2.Scrolling the Web Page
On most browsers it is recommended that you use the scroll bar not the mouse wheel to best view the parallax scroll. The FireFox browser has by far the smoothest scrolling, and still works very well even using mouse-scroll. The parallex effect also works on touch devices where you swipe scroll instead. But it should be noted that if you use these effects a lot, with large items or hi-res images scrolling, this does require quite a fast phone / tablet to keep up. Modern phones and tablets are nearly as fast as desktop PCs now.Replace Symbol (another new feature)
Assuming you've opened the RectangleDemo file. That arrow was created using the Symbol Picker (Insert > Symbol...). There are now more than 1500 great quality symbols like this included in Web Designer 365. To replace it simply right click on the symbol and select 'Replace Symbol'. This accesses the symbol picker where you can search for a symbol of your choice (for example, search for 'arrow' to see all the available arrow symbols). Simply select any alternative symbol as a replacement. It’s that easy!Xara Web Designer 365
Xara Web Designer is unlike any web design software you will have seen before; it’s an easy template based solution that gives you total page design freedom, no HTML skills required. It comes in 2 versions, Web Designer and Web Designer Premium that offers advanced web design features (including parallax). More information. Give it a try! Download Web Designer trial version.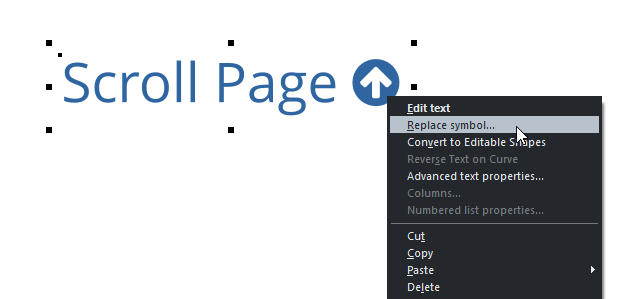


Copyright © 2015 Xara Group Limited.
Page created with Xara Designer Pro

Websites are becoming more dynamic with more movement and animation, instead of simple, 'old style'
static, low impact websites.
The evolution started with the simplest mouseover effect, whereby objects like navigation bars and buttons
highlighted as you moved over them, and it has evolved from there. Now most modern websites have
animation in one form or another - objects sliding in, fading in or out, more complex animations on
mouseover (e.g. a message appears on a photo as you mouse over it) and the latest effects tied to
scrolling - from a simple 'stick at top' NavBar (so it's always available and doesn't scroll off the top as it
would on a static website), to animations tied to scrolling, which include parallax effects.
This month we're just focusing on parallax, and demonstrating how this simple one page website was
created. It's amazing to think that such effects can be done with no programming, Javascript , coding, CSS
or anything technical!
To try it, download the trial version of Web Designer 365 Premium.
Web page using parallax scrolling, sticky heading and sub heading with reveal animation
See Crazy Cakes web page
What is Parallax Scrolling?
Parallax is the effect you get when, for example, looking out of a train window and things near you wizz past quickly, while things further away scroll past your view more slowly, and things in the distance hardly move at all. You can create a website using this effect to give a sort of 3D appearance as you scroll down the web page. Parallax is now being used more generally to give interesting scroll effects - and it’s a great way to create an innovative website which will be noteworthy and admired by visitors. Click on the Crazy Cakes web page to see an example of some interesting scroll effects. In Web Designer 365 Premium you can control how fast things scroll. There's a slider control in the new Parallax animation dialog (details below). Using the slider you can control how fast things scroll from 0% of the normal speed (which means objects do not scroll at all - they are the same as 'sticky') up to 100% of the scroll speed, which is the same as all normal page items ie. the objects scroll as fast as you scroll the page. Look at this simple rectangle test which demonstrates the different speeds. You can download the file to experiment with your Web Designer 365 Premium - download There are 10 simple squares across the page, to which I've set variable parallax speeds, between 10% and 100% of normal speed. (We recommend using the scroll bar not the mouse wheel to best see the effect). You can see that the speed of each rectangle scrolls differently.How to Create your Parallax Effects
Firstly, select the object that you wish to add the parallax effect to. Then select the Menu option Utilities and then Web Animation and the Reveal/Scroll tab. Then select the scroll animation option, and Parallax from the Animation drop-down menu and click ‘Apply’. In this instance, parallax set at 50%.Viewing Scrolling Objects:
When viewing on a published web page, objects have to start 'below the fold' i.e. off the bottom of the page for scroll effects to work. If they start on a visible part of the page then there is no scrolling to see them, so if you applied a scroll effect nothing would happen. This often means you need to make your web page taller - which in Web Designer is as easy as selecting the bottom edge line and dragging it down the window to make your web page as tall as you wish.Stacking Order
If you want objects to scroll on top of other objects, you need to take care to get the stacking order right - use the Arrange > ’move backwards’ or ‘bring to front’ re-ordering controls.Experiment
It may be a little difficult to get your head around what's actually happening on the page - so experiment - it's the best way to explore the possibilities. To see your web page at any time during its creation select ‘Preview page’.Features of the Crazy Cakes Web Page
Here’s how this Crazy Cakes Web page was created: 1. Open a New blank web page document, 960px wide, and add a selection of photos. 2. All photos are stretched to be full width. Using the new Photo stretch / clip feature it is now easy to make images wide, like a panorama. Just click to select the photo and drag the new style control handles to make it wider. 3. All photos are set to 'stretch full width'. You'll see that as you vary your browser window width, the images scale to fit. This is the Utilities > Web Sticky /Stretchy dialog: 4. The top picture has a parallax value of 50% normal scroll speed. 5. The Crazy Cakes heading (using AmaticSC Google font) has a soft shadow and is set to be sticky (same Web Sticky / Stretchy dialog as above). This means it never moves as you scroll the page. 6. The Crazy Cakes heading also has a reveal effect 'slide in from bottom' which it does as the heading is revealed. 7. The cyan rectangle under the photo is also set to parallax scroll 50% so that the top two pictures will move together. 8. The right top column of text is Google Font 'BenchNine Regular', set to white. This has a Reveal Animation (Utilities > Web Animation) of 'Flip in vertical'. Which means that as soon as it's revealed it performs this animation - and every time you scroll back on it, it animates again. There are many different reveal animations that you can apply to your objects. This column of text has no parallax scroll. This is because it has a reveal animation and it can't have scroll animation at the same time. So as you scroll the page up - this text goes over the top two images - they are set at half scroll speed. 9. There is a collection of chocolate related photos below this. They have all been set with different Parallax scroll speeds. Trial and error is required here to get the desired overlapping / underlapping and scroll speeds. 10. The brown rectangle is a simple brown rectangle with no effects and no Parallax scroll - it scrolls up the page at the speed of the browser. 11. The 'slide in 'Chocolate Cakes' text and its associated 'Naughty but nice' text use a more advanced 'trigger' effect, so they are only triggered when an invisible trigger object (in this case, a bit of text off the side of the page) gets scrolled on - this triggers the slide-in animation. So that's how the 'Chocolate Cakes' heading only slide-ins when you've scrolled down a certain distance. To create this: Place the trigger object down the page so as it's scrolled on, it will trigger the animations. Using the ‘Name’ Dialog, give it a name say 'Trigger1'. Then on the Chocolate Cake heading, which starts off on the right side, apply this: 12. The Slide in from right reveal animation is set to about 1 second, with the Trigger object name set to be Trigger1. This type of 'trigger' concept is very powerful and allows quite complex animations to be created and controlled to appear when you want them to. I was experimenting with parallax to create a concertina effect with the chocolate photos. You can see the results on these two web pages - ParallaxTest1 and ParallaxTest2.Scrolling the Web Page
On most browsers it is recommended that you use the scroll bar not the mouse wheel to best view the parallax scroll. The FireFox browser has by far the smoothest scrolling, and still works very well even using mouse-scroll. The parallex effect also works on touch devices where you swipe scroll instead. But it should be noted that if you use these effects a lot, with large items or hi-res images scrolling, this does require quite a fast phone / tablet to keep up. Modern phones and tablets are nearly as fast as desktop PCs now.Replace Symbol (another new feature)
Assuming you've opened the RectangleDemo file. That arrow was created using the Symbol Picker (Insert > Symbol...). There are now more than 1500 great quality symbols like this included in Web Designer 365. To replace it simply right click on the symbol and select 'Replace Symbol'. This accesses the symbol picker where you can search for a symbol of your choice (for example, search for 'arrow' to see all the available arrow symbols). Simply select any alternative symbol as a replacement. It’s that easy!Xara Web Designer 365
Xara Web Designer is unlike any web design software you will have seen before; it’s an easy template based solution that gives you total page design freedom, no HTML skills required. It comes in 2 versions, Web Designer and Web Designer Premium that offers advanced web design features (including parallax). More information. Give it a try! Download Web Designer trial version.


Copyright © 2015 Xara Group Limited.
Page created with Xara Designer Pro

Websites are becoming more dynamic with more movement and
animation, instead of simple, 'old style' static, low impact websites.
The evolution started with the simplest mouseover effect, whereby
objects like navigation bars and buttons highlighted as you moved
over them, and it has evolved from there. Now most modern
websites have animation in one form or another - objects sliding in,
fading in or out, more complex animations on mouseover (e.g. a
message appears on a photo as you mouse over it) and the latest
effects tied to scrolling - from a simple 'stick at top' NavBar (so it's
always available and doesn't scroll off the top as it would on a static
website), to animations tied to scrolling, which include parallax
effects.
This month we're just focusing on parallax, and demonstrating how
this simple one page website was created. It's amazing to think that
such effects can be done with no programming, Javascript , coding,
CSS or anything technical!
To try it, download the trial version of Web Designer 365 Premium.
Web page using parallax scrolling, sticky heading and sub heading
with reveal animation
See Crazy Cakes web page
What is Parallax Scrolling?
Parallax is the effect you get when, for example, looking out of a train window and things near you wizz past quickly, while things further away scroll past your view more slowly, and things in the distance hardly move at all. You can create a website using this effect to give a sort of 3D appearance as you scroll down the web page. Parallax is now being used more generally to give interesting scroll effects - and it’s a great way to create an innovative website which will be noteworthy and admired by visitors. Click on the Crazy Cakes web page to see an example of some interesting scroll effects. In Web Designer 365 Premium you can control how fast things scroll. There's a slider control in the new Parallax animation dialog (details below). Using the slider you can control how fast things scroll from 0% of the normal speed (which means objects do not scroll at all - they are the same as 'sticky') up to 100% of the scroll speed, which is the same as all normal page items ie. the objects scroll as fast as you scroll the page. Look at this simple rectangle test which demonstrates the different speeds. You can download the file to experiment with your Web Designer 365 Premium - download There are 10 simple squares across the page, to which I've set variable parallax speeds, between 10% and 100% of normal speed. (We recommend using the scroll bar not the mouse wheel to best see the effect). You can see that the speed of each rectangle scrolls differently.How to Create your Parallax Effects
Firstly, select the object that you wish to add the parallax effect to. Then select the Menu option Utilities and then Web Animation and the Reveal/Scroll tab. Then select the scroll animation option, and Parallax from the Animation drop-down menu and click ‘Apply’. In this instance, parallax set at 50%.Viewing Scrolling Objects:
When viewing on a published web page, objects have to start 'below the fold' i.e. off the bottom of the page for scroll effects to work. If they start on a visible part of the page then there is no scrolling to see them, so if you applied a scroll effect nothing would happen. This often means you need to make your web page taller - which in Web Designer is as easy as selecting the bottom edge line and dragging it down the window to make your web page as tall as you wish.Stacking Order
If you want objects to scroll on top of other objects, you need to take care to get the stacking order right - use the Arrange > ’move backwards’ or ‘bring to front’ re-ordering controls.Experiment
It may be a little difficult to get your head around what's actually happening on the page - so experiment - it's the best way to explore the possibilities. To see your web page at any time during its creation select ‘Preview page’.Features of the Crazy Cakes Web Page
Here’s how this Crazy Cakes Web page was created: 1. Open a New blank web page document, 960px wide, and add a selection of photos. 2. All photos are stretched to be full width. Using the new Photo stretch / clip feature it is now easy to make images wide, like a panorama. Just click to select the photo and drag the new style control handles to make it wider. 3. All photos are set to 'stretch full width'. You'll see that as you vary your browser window width, the images scale to fit. This is the Utilities > Web Sticky /Stretchy dialog: 4. The top picture has a parallax value of 50% normal scroll speed. 5. The Crazy Cakes heading (using AmaticSC Google font) has a soft shadow and is set to be sticky (same Web Sticky / Stretchy dialog as above). This means it never moves as you scroll the page. 6. The Crazy Cakes heading also has a reveal effect 'slide in from bottom' which it does as the heading is revealed. 7. The cyan rectangle under the photo is also set to parallax scroll 50% so that the top two pictures will move together. 8. The right top column of text is Google Font 'BenchNine Regular', set to white. This has a Reveal Animation (Utilities > Web Animation) of 'Flip in vertical'. Which means that as soon as it's revealed it performs this animation - and every time you scroll back on it, it animates again. There are many different reveal animations that you can apply to your objects. This column of text has no parallax scroll. This is because it has a reveal animation and it can't have scroll animation at the same time. So as you scroll the page up - this text goes over the top two images - they are set at half scroll speed. 9. There is a collection of chocolate related photos below this. They have all been set with different Parallax scroll speeds. Trial and error is required here to get the desired overlapping / underlapping and scroll speeds. 10. The brown rectangle is a simple brown rectangle with no effects and no Parallax scroll - it scrolls up the page at the speed of the browser. 11. The 'slide in 'Chocolate Cakes' text and its associated 'Naughty but nice' text use a more advanced 'trigger' effect, so they are only triggered when an invisible trigger object (in this case, a bit of text off the side of the page) gets scrolled on - this triggers the slide-in animation. So that's how the 'Chocolate Cakes' heading only slide-ins when you've scrolled down a certain distance. To create this: Place the trigger object down the page so as it's scrolled on, it will trigger the animations. Using the ‘Name’ Dialog, give it a name say 'Trigger1'. Then on the Chocolate Cake heading, which starts off on the right side, apply this: 12. The Slide in from right reveal animation is set to about 1 second, with the Trigger object name set to be Trigger1. This type of 'trigger' concept is very powerful and allows quite complex animations to be created and controlled to appear when you want them to. I was experimenting with parallax to create a concertina effect with the chocolate photos. You can see the results on these two web pages - ParallaxTest1 and ParallaxTest2.Scrolling the Web Page
On most browsers it is recommended that you use the scroll bar not the mouse wheel to best view the parallax scroll. The FireFox browser has by far the smoothest scrolling, and still works very well even using mouse-scroll. The parallex effect also works on touch devices where you swipe scroll instead. But it should be noted that if you use these effects a lot, with large items or hi-res images scrolling, this does require quite a fast phone / tablet to keep up. Modern phones and tablets are nearly as fast as desktop PCs now.Replace Symbol (another new feature)
Assuming you've opened the RectangleDemo file. That arrow was created using the Symbol Picker (Insert > Symbol...). There are now more than 1500 great quality symbols like this included in Web Designer 365. To replace it simply right click on the symbol and select 'Replace Symbol'. This accesses the symbol picker where you can search for a symbol of your choice (for example, search for 'arrow' to see all the available arrow symbols). Simply select any alternative symbol as a replacement. It’s that easy!Xara Web Designer 365
Xara Web Designer is unlike any web design software you will have seen before; it’s an easy template based solution that gives you total page design freedom, no HTML skills required. It comes in 2 versions, Web Designer and Web Designer Premium that offers advanced web design features (including parallax). More information. Give it a try! Download Web Designer trial version.

Copyright © 2015 Xara Group Limited.
Page created with Xara Designer Pro
SCROLLING BACKGROUNDS WITH XARA WEB DESIGNER
SCROLLING BACKGROUNDS WITH XARA WEB DESIGNER
SCROLLING BACKGROUNDS WITH XARA WEB DESIGNER
SCROLLING BACKGROUNDS WITH
XARA WEB DESIGNER