

thinking outside the box


XARA TUTORIAL
Text here...


Colors and Outlines
Draw a new rectangle and select the ‘curved corners’ button on the InfoBar.
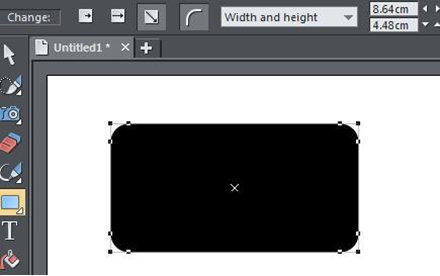 Rectangle tool selected showing the Rectangle InfoBar and handles of the curved corners button
With the rectangle still selected change the color by clicking on a color on the color line at the bottom of the editor (more on colors later).
You can add an outline to the rectangle by selecting the line width from the drop-down menu on the top bar. I have selected a line of 4pt
thickness
Note: If you’re creating shapes on a print document, the line width defaults to pts (points, 1 pt = 1/72 inch). if you’re
working on web documents, the measurement unit is pixels (px). On a Mac points and pixels are the same thing, but on
PCs and the web, thy are not 1 px is typically 1/96th inch.
This produces a solid outline but you can change the style of the outline. On the right side of the editor there is a Line Gallery,
Rectangle tool selected showing the Rectangle InfoBar and handles of the curved corners button
With the rectangle still selected change the color by clicking on a color on the color line at the bottom of the editor (more on colors later).
You can add an outline to the rectangle by selecting the line width from the drop-down menu on the top bar. I have selected a line of 4pt
thickness
Note: If you’re creating shapes on a print document, the line width defaults to pts (points, 1 pt = 1/72 inch). if you’re
working on web documents, the measurement unit is pixels (px). On a Mac points and pixels are the same thing, but on
PCs and the web, thy are not 1 px is typically 1/96th inch.
This produces a solid outline but you can change the style of the outline. On the right side of the editor there is a Line Gallery,  select it
and then select the folder ‘Dash Patterns’ and then double click on one of the patterns – I chose a ‘dashed’ line to produce the following
effect: -
select it
and then select the folder ‘Dash Patterns’ and then double click on one of the patterns – I chose a ‘dashed’ line to produce the following
effect: -
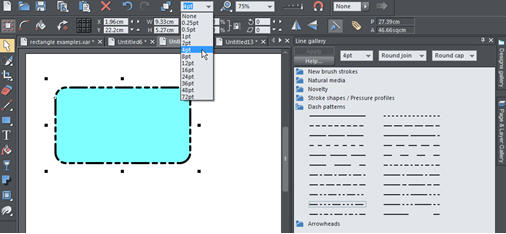 The drop-down line thickness menu and the dash patterns in the Line Gallery.
There’s a short-cut to setting the line color - hold Shift and click on the color on the color line. or you can simply right click on a color and
select the Fill or Outline color from the menu.
The drop-down line thickness menu and the dash patterns in the Line Gallery.
There’s a short-cut to setting the line color - hold Shift and click on the color on the color line. or you can simply right click on a color and
select the Fill or Outline color from the menu.
Photos within rectangles
You can fill your rectangle with a very wide range of fill styles - complex graduated colors and transparency. But you can also put a photo into the rectangle - and this allows, for example, a way to have rounded corner photos. Here’s how to create a rounded corner photo. Create a new rectangle – select the Rectangle Tool and draw a rectangle. Note that this rectangle has adopted the same attributes (fill color, outline style, etc) as the last object you drew (so it will have a dashed outline if you did the above). To return it to a plain line style open up the Line Gallery and double click on the straight line in the Dash Patterns folder, then select the ‘curved corners’ button (on the main InfoBar) to return the outline to a regular rectangle shape. Now thicken the outline by selecting 8pt from the drop down option on the Top Bar. There are two ways to put a photo in your rectangle (or any shape). 1. The direct method: Drag a photo file (typically a JPG) from your Windows file explorer and while holding the Shift key, drop it on the shape you want to fill. If you do not hold the Shift key it just imports the image onto the page. 2. If you already have the photo in your document somewhere, you can access it directly from the Fill Tool InfoBar. Select a fill style of ‘bitmap’ and then using the fourth control along the InfoBar, select from the drop down list of all the images used in this document.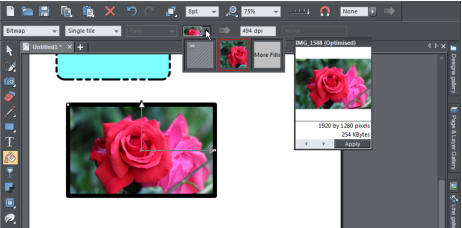 Access the images in the Bitmap gallery from the drop down menu on the Fill Tool InfoBar
Note: If you drag and drop a photo file onto a shape that already has a photo fill, it just replaces it with the new one. No need
to hold Shift.
You can also drag a photo from the Bitmap Gallery on the right side - this also shows you all the images used in this
document.
Tip: One of the advanced memory saving features of Xara is that you can use as many copies of a photo as you like, it
requires no more memory than the first copy.
Access the images in the Bitmap gallery from the drop down menu on the Fill Tool InfoBar
Note: If you drag and drop a photo file onto a shape that already has a photo fill, it just replaces it with the new one. No need
to hold Shift.
You can also drag a photo from the Bitmap Gallery on the right side - this also shows you all the images used in this
document.
Tip: One of the advanced memory saving features of Xara is that you can use as many copies of a photo as you like, it
requires no more memory than the first copy.

