


 7) Customizing your photos and graphics
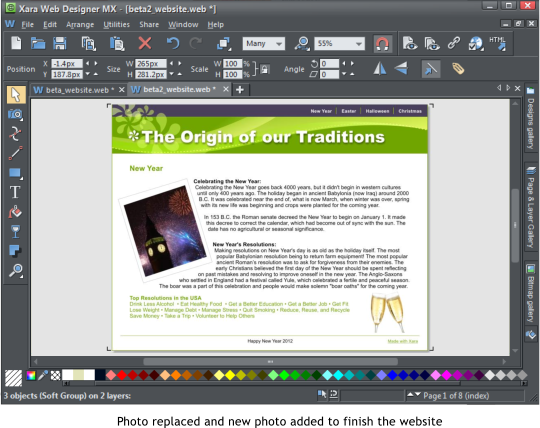
To add your own photos, simply drag and drop a photo file from Windows File Explorer. If you drop the photo on the page or on top of some text, it is
added as a new photo (which you can move and resize as described previously).
If you drop the photo on top of an existing photo, it will replace that photo. Try it on the photos at the top of the first page.
Web Designer includes some powerful photo editing tools. You can adjust the brightness, color, sharpness, and more, as well as crop any
picture. Select the Enhance photos tool from the left tool bar. Now click on any photo and, using the controls at the top, adjust the various
settings such as brightness, color, etc. The last slider control alters the blur or sharpness.
8) Adding or removing pages
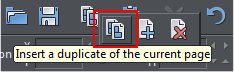
If you want to add a new page to the website in a similar style to the current one, just click the page icon on the top tool bar and it will be added next
to the current selected page. (Or go to the Edit -> Pages menu). If you want to add a new page open the Designs Gallery and just drag another page
design from your theme set onto your document. Notice how it automatically matches the colors of your website. And in both cases an extra navigation
button will be automatically added to your Navigation bar.
9) Save
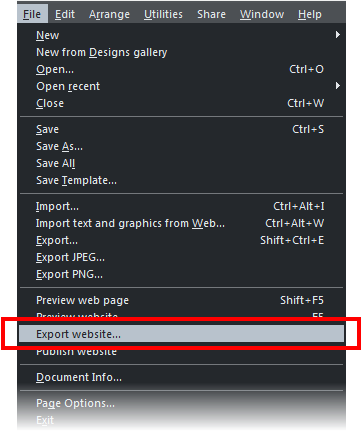
When you select File > Save this saves your website as a Web Designer.web file. This is the working format for Web Designer MX. To save the HTML files
for viewing in a browser you must choose the File > Export Website menu option. This creates one HTML file for each page of your website and puts all
the associated files into a folder next to this.
10) Publishing
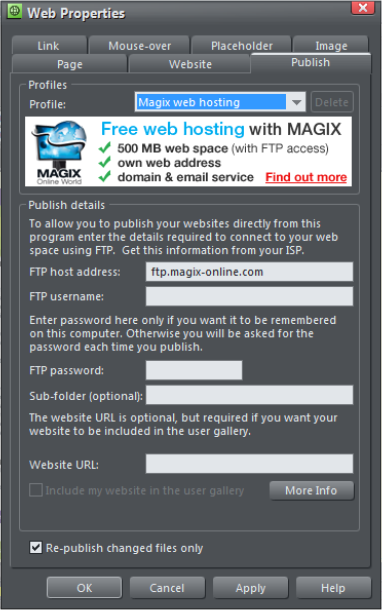
To put your website on the web for all to see, you need to upload it to your web space. Web Designer MX includes a free hosting offer from MAGIX
Online World, which provides you with 500 megabytes of web space and a personal web address for free. You can get your free MAGIX web hosting here.
The process of transferring your website from your hard disk to the web server at your hosting company is called FTP upload (file transfer protocol). You
need three pieces of information: Your FTP host address, your username and password. Select File -> Publish Website and you'll be asked to enter those
FTP details.
That's it! You've created a great looking website in a few minutes, with your own content, photos and color. Xara Web Designer MX can do a lot more -
it's probably the most flexible powerful web design program, that doesn't require any knowledge of HTML. If you're a creative designer your options are
unlimited with Web Designer MX. And if you're less creative, or do not have the time, then just customize the templates as we've done here.
You can find another intro tutorial that covers some of the more advanced features at webdesigner.xara.com and you can find out more about Web
Designer, watch the demo movies and check out the gallery of websites created by Xara customers on our website at www.xara.com/webdesigner.
7) Customizing your photos and graphics
To add your own photos, simply drag and drop a photo file from Windows File Explorer. If you drop the photo on the page or on top of some text, it is
added as a new photo (which you can move and resize as described previously).
If you drop the photo on top of an existing photo, it will replace that photo. Try it on the photos at the top of the first page.
Web Designer includes some powerful photo editing tools. You can adjust the brightness, color, sharpness, and more, as well as crop any
picture. Select the Enhance photos tool from the left tool bar. Now click on any photo and, using the controls at the top, adjust the various
settings such as brightness, color, etc. The last slider control alters the blur or sharpness.
8) Adding or removing pages
If you want to add a new page to the website in a similar style to the current one, just click the page icon on the top tool bar and it will be added next
to the current selected page. (Or go to the Edit -> Pages menu). If you want to add a new page open the Designs Gallery and just drag another page
design from your theme set onto your document. Notice how it automatically matches the colors of your website. And in both cases an extra navigation
button will be automatically added to your Navigation bar.
9) Save
When you select File > Save this saves your website as a Web Designer.web file. This is the working format for Web Designer MX. To save the HTML files
for viewing in a browser you must choose the File > Export Website menu option. This creates one HTML file for each page of your website and puts all
the associated files into a folder next to this.
10) Publishing
To put your website on the web for all to see, you need to upload it to your web space. Web Designer MX includes a free hosting offer from MAGIX
Online World, which provides you with 500 megabytes of web space and a personal web address for free. You can get your free MAGIX web hosting here.
The process of transferring your website from your hard disk to the web server at your hosting company is called FTP upload (file transfer protocol). You
need three pieces of information: Your FTP host address, your username and password. Select File -> Publish Website and you'll be asked to enter those
FTP details.
That's it! You've created a great looking website in a few minutes, with your own content, photos and color. Xara Web Designer MX can do a lot more -
it's probably the most flexible powerful web design program, that doesn't require any knowledge of HTML. If you're a creative designer your options are
unlimited with Web Designer MX. And if you're less creative, or do not have the time, then just customize the templates as we've done here.
You can find another intro tutorial that covers some of the more advanced features at webdesigner.xara.com and you can find out more about Web
Designer, watch the demo movies and check out the gallery of websites created by Xara customers on our website at www.xara.com/webdesigner.

 © Xara Group Limited