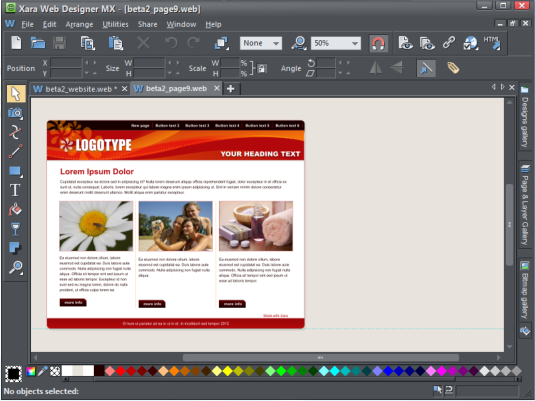


 1) Open the Designs Gallery and select a design
Move your mouse over the 'Designs Gallery' label on the right side of the window and click on the Website Template Theme to see one of the many
designs and template layouts then Free Example. Double click on the first template labelled Website which will open the complete ready-made 16 page
website that we're going to customize in this tutorial.
By default Web Designer opens a new document showing just one page, with the page gallery docked to the right side of the screen showing all the
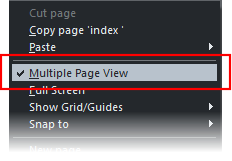
pages. I prefer to work full screen without the Page & Layer Gallery and to have all the pages shown one below the other. To view all the pages in your
website document, right click on the page background and choose 'Multiple Page View'. You can now scroll the Web Designer window up and down to
view and rapidly move to all the pages in the website.
2. Edit the Theme Colors
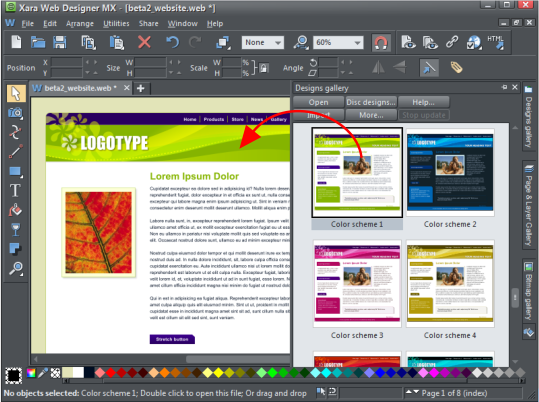
To make color editing easy, Xara provide some ready-made color schemes with every theme set, that you can drag 'n' drop onto the page. In the Designs
Gallery, scroll down to the bottom of this theme set to see the Color Scheme thumbnails. Drag any onto the page and you will see all the website colors
change in an instant. I changed this website to color scheme 1.
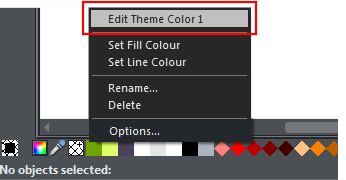
If you prefer to choose you own color schemes then that is also easy. Move the mouse pointer over the left end of the Color Line at the bottom of the
screen and right click on any of the square color patches, which are the theme colors for this design. Select 'Edit' to display the color editor, and you
can now select different colors. For the best results we suggest you don’t introduce too many different colors and stick with matching colors.
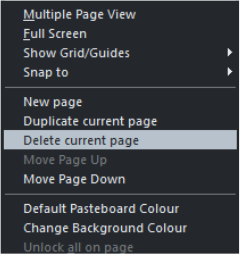
3) Edit the number of pages and Navigation bar
The default is 8 pages for this website. If you wish to have less pages scroll down the pages and decide which ones you want to delete. Select the page
then right click on the background outside of the page and select ‘Delete current page’. Note: This will automatically update the Navigation bar across
the top of each page to show buttons for the remaining pages.
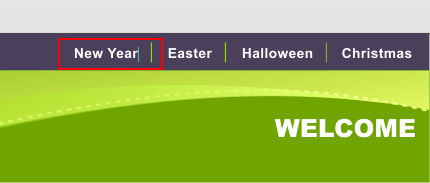
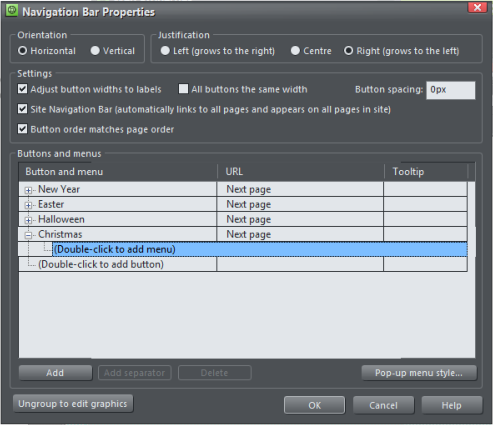
I now have 4 pages, and next I'll change the labels of the navigation buttons. Note: The Navigation bar has been set up as what we call a
‘repeating object’ so it will automatically change throughout the website. Using the Text tool, click on the navigation button text and edit it,
and you'll see the button graphic change. Scroll down the page and you will see that it has changed on all of your other web pages. Easy!
Web Designer includes what is probably the most advanced Navigation bar (NavBar) building feature of any web authoring program. There are lots of
designs to choose from and they stretch to adjust for any length text label or you can have them all in the same width (this can be changed in the
NavBar editor by double clicking on the NavBar). You can also incorporate drop-down menus with various animation and transparency effects.
1) Open the Designs Gallery and select a design
Move your mouse over the 'Designs Gallery' label on the right side of the window and click on the Website Template Theme to see one of the many
designs and template layouts then Free Example. Double click on the first template labelled Website which will open the complete ready-made 16 page
website that we're going to customize in this tutorial.
By default Web Designer opens a new document showing just one page, with the page gallery docked to the right side of the screen showing all the
pages. I prefer to work full screen without the Page & Layer Gallery and to have all the pages shown one below the other. To view all the pages in your
website document, right click on the page background and choose 'Multiple Page View'. You can now scroll the Web Designer window up and down to
view and rapidly move to all the pages in the website.
2. Edit the Theme Colors
To make color editing easy, Xara provide some ready-made color schemes with every theme set, that you can drag 'n' drop onto the page. In the Designs
Gallery, scroll down to the bottom of this theme set to see the Color Scheme thumbnails. Drag any onto the page and you will see all the website colors
change in an instant. I changed this website to color scheme 1.
If you prefer to choose you own color schemes then that is also easy. Move the mouse pointer over the left end of the Color Line at the bottom of the
screen and right click on any of the square color patches, which are the theme colors for this design. Select 'Edit' to display the color editor, and you
can now select different colors. For the best results we suggest you don’t introduce too many different colors and stick with matching colors.
3) Edit the number of pages and Navigation bar
The default is 8 pages for this website. If you wish to have less pages scroll down the pages and decide which ones you want to delete. Select the page
then right click on the background outside of the page and select ‘Delete current page’. Note: This will automatically update the Navigation bar across
the top of each page to show buttons for the remaining pages.
I now have 4 pages, and next I'll change the labels of the navigation buttons. Note: The Navigation bar has been set up as what we call a
‘repeating object’ so it will automatically change throughout the website. Using the Text tool, click on the navigation button text and edit it,
and you'll see the button graphic change. Scroll down the page and you will see that it has changed on all of your other web pages. Easy!
Web Designer includes what is probably the most advanced Navigation bar (NavBar) building feature of any web authoring program. There are lots of
designs to choose from and they stretch to adjust for any length text label or you can have them all in the same width (this can be changed in the
NavBar editor by double clicking on the NavBar). You can also incorporate drop-down menus with various animation and transparency effects.

 © Xara Group Limited